You've read the case studies. You've seen the numbers—70% faster processing, 62% fewer no-shows, 85% time savings. You're convinced AI automation can help your business.
But where do you actually start?
If you're not technical, the gap between "AI could save us time" and "we have a working system" feels enormous. It doesn't have to be.
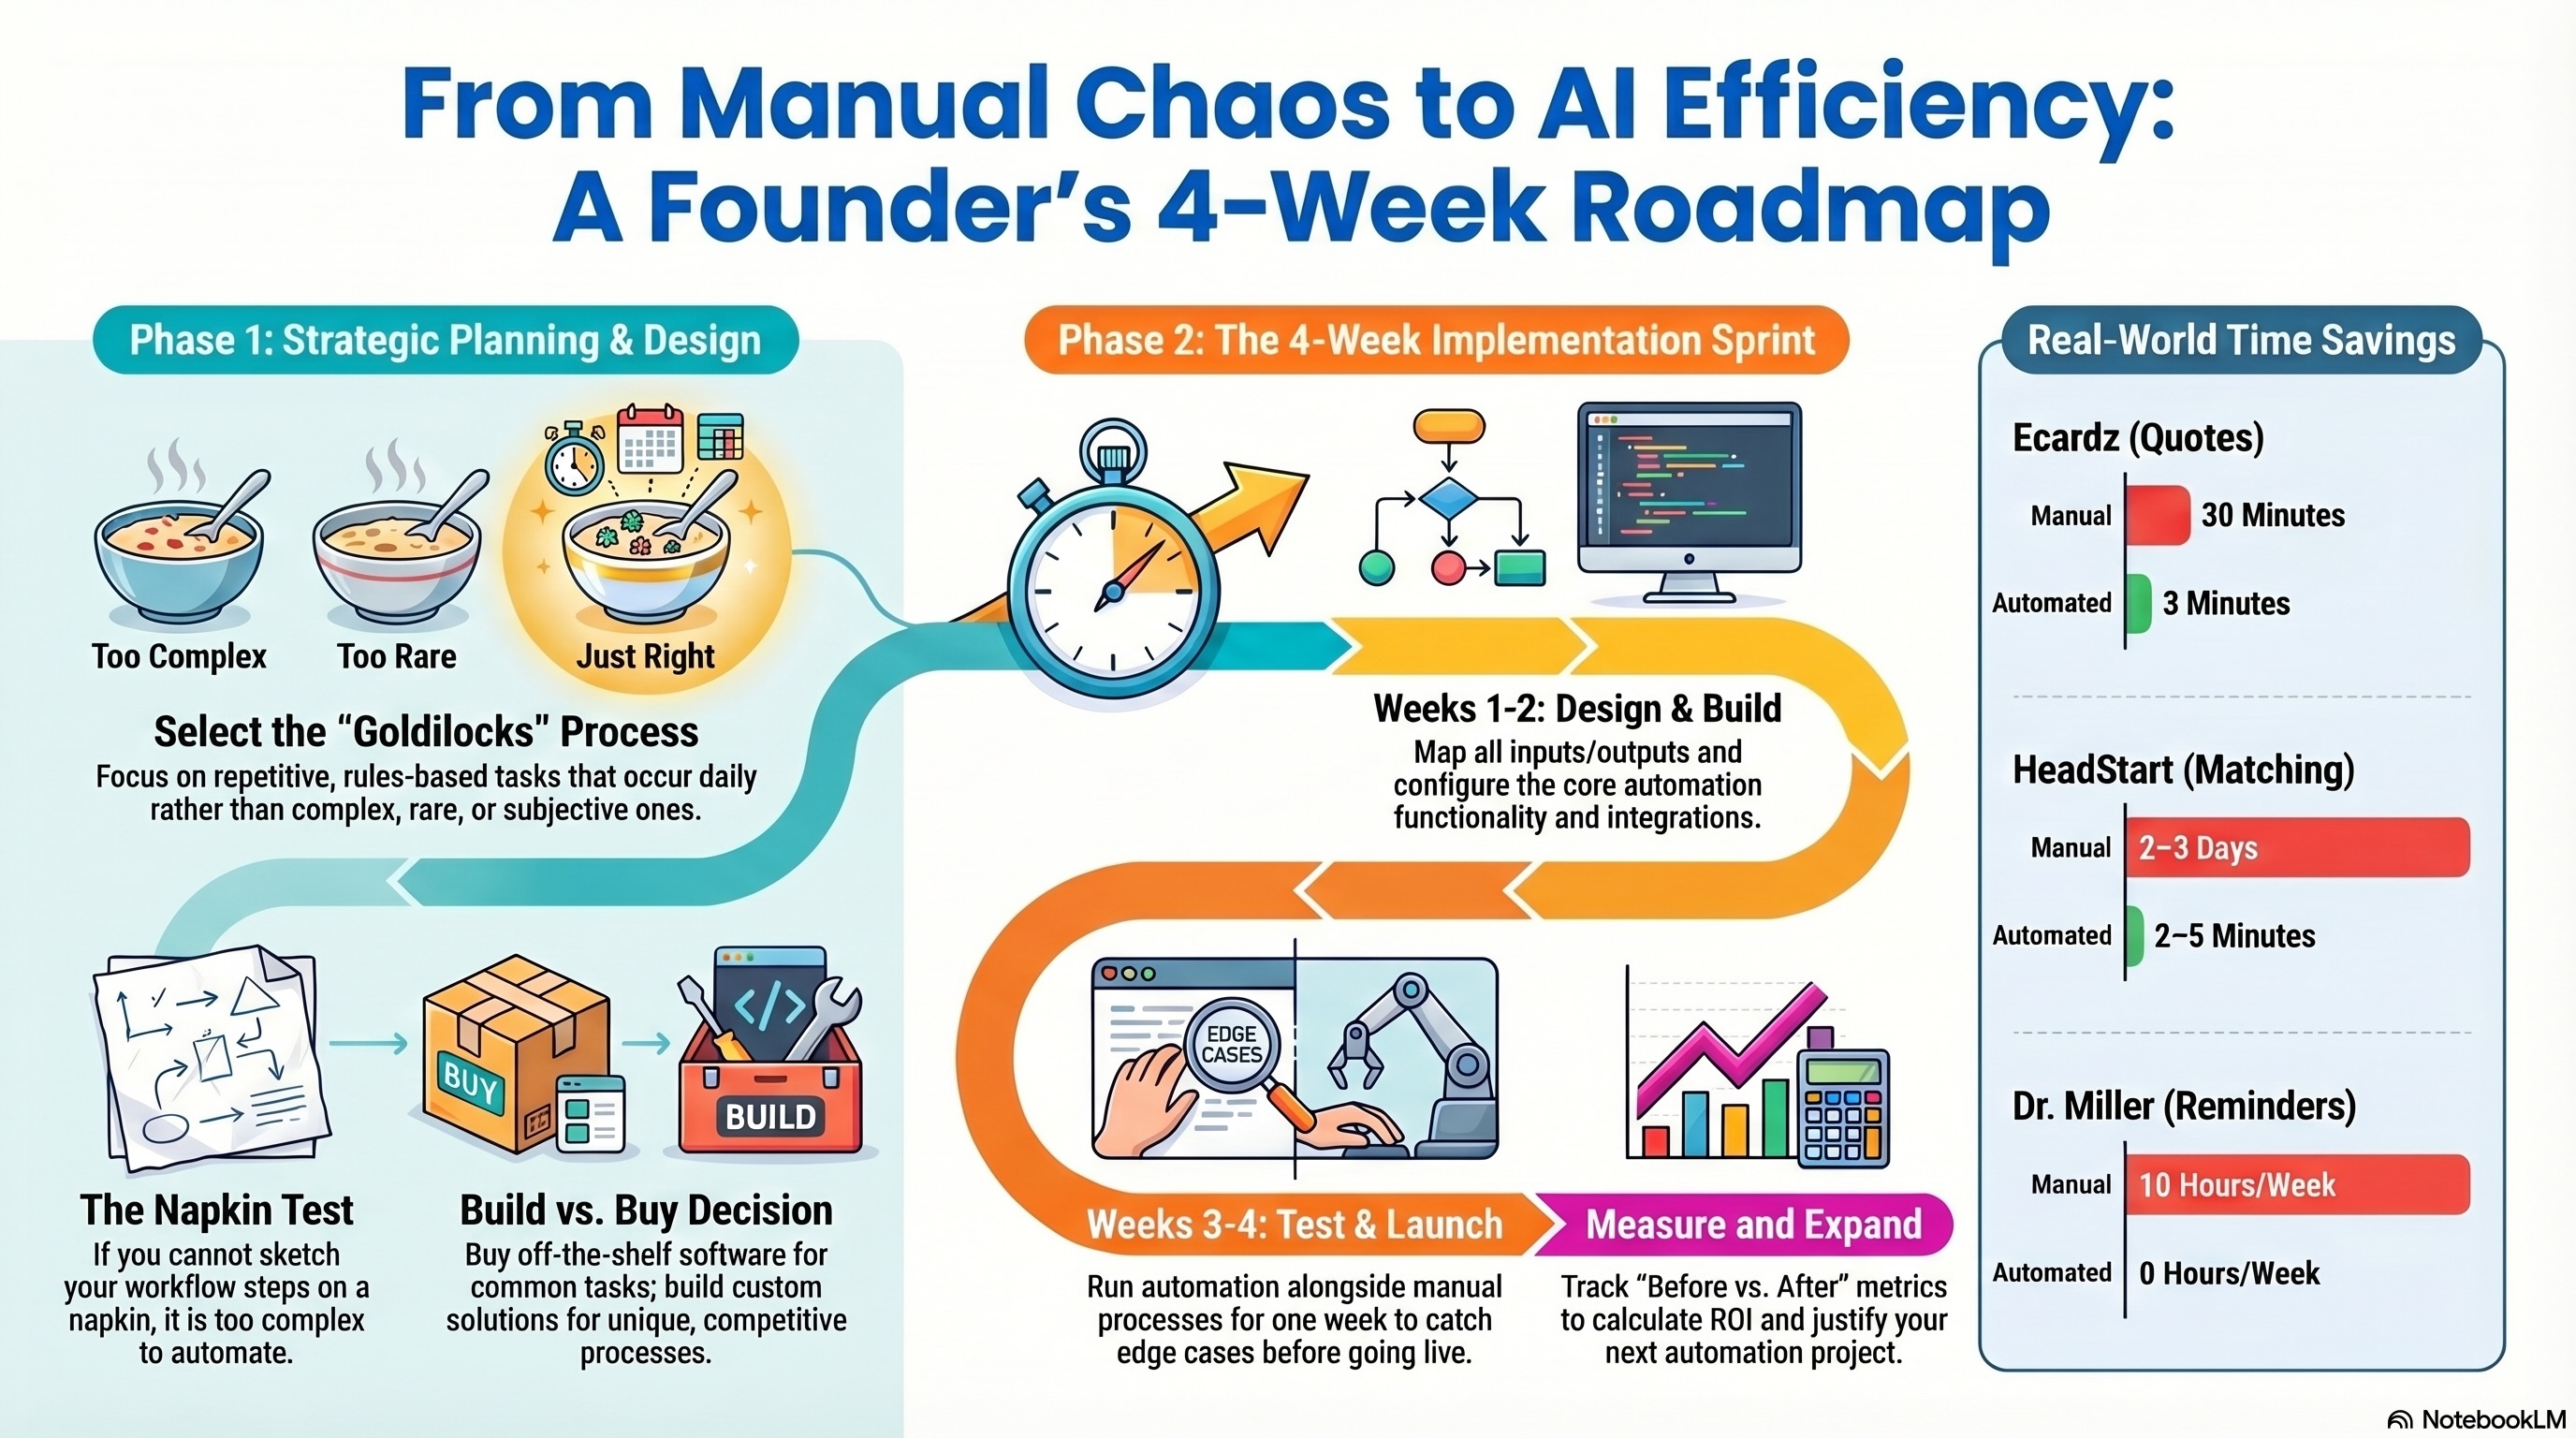
This guide walks you through building your first automation workflow from scratch—no coding knowledge required, no jargon, just a practical framework used by businesses like Ecardz, HeadStart Australia, and Dr. Miller to go from manual chaos to automated efficiency in 4 weeks or less.
🎯 Step 1: Choose the Right Process to Automate (This Is Where Most People Go Wrong)
The number one mistake businesses make: trying to automate the wrong thing first.
Don't start with:
- •Your most complex process (too many variables, too risky)
- •Something that rarely happens (low ROI)
- •A process nobody fully understands (you'll automate confusion)
Start with a process that is:
- •✅ Repetitive — happens daily or weekly, same steps every time
- •✅ Rules-based — clear logic, not judgment calls
- •✅ Time-consuming — takes significant staff hours
- •✅ Error-prone — manual execution leads to mistakes
- •✅ Measurable — you can track before/after impact
Real Examples of Great First Automations:
- •Ecardz started with quote creation—repetitive, rules-based pricing calculations done 100+ times monthly
- •Dr. Miller started with appointment reminders—same call script, same sequence, 200+ times weekly
- •HeadStart started with worker matching—clear criteria (location, availability, skills), done for every referral
Warning Sign: If you can't describe your process as "when X happens, do Y" with clear steps, it's not ready for automation yet. Map it out first.
📋 Step 2: Map Your Current Workflow (The Napkin Test)
Before you build anything, you need to understand exactly what happens today.
The Napkin Test: Can you draw your workflow on a napkin? If not, it's too complicated or poorly understood.
How to map your workflow:
- •Watch someone do it — Sit with the team member who handles this task and watch the entire process from trigger to completion
- •Write every step — Including the ones that seem obvious ("open email," "copy customer name," "paste into spreadsheet")
- •Note decision points — Where does the human make a choice? ("If order is over $500, apply discount")
- •Time each step — Rough estimates are fine. You'll be shocked where time actually goes.
- •Count frequency — How many times per day/week does this happen?
Example: Ecardz Quote Creation (Before Automation)
- •Receive inquiry via email (2 min to read)
- •Search for customer in spreadsheet (5 min)
- •If new customer, create entry (3 min)
- •Look up product pricing (5 min)
- •Calculate quantities and discounts (5 min)
- •Format quote document (5 min)
- •Double-check calculations (3 min)
- •Email quote to customer (2 min)
Total: 30 minutes × 100 quotes/month = 50 hours/month
Once you see the process mapped out, the automation opportunities become obvious.
🔧 Step 3: Define What 'Done' Looks Like
Vague goals produce vague results. Before building anything, write down exactly what success means.
Use this framework:
"After automation, [process] should take [time] instead of [current time], with [accuracy] and [who does what]."
Real examples:
- •Ecardz: "After automation, creating a quote should take 3 minutes instead of 30, with 100% calculation accuracy, and staff only needs to select the customer and products."
- •Dr. Miller: "After automation, appointment reminders should require 0 staff hours instead of 10/week, with 90%+ patient contact rate, and the system handles all calls and rescheduling."
- •HeadStart: "After automation, matching a participant to a worker should take 2-5 minutes instead of 2-3 days, with conflict-free scheduling, and administrators only need to approve the AI's recommendation."
Key Questions to Answer:
- •What triggers the automated workflow?
- •What information does the system need as input?
- •What should the output look like?
- •Where does a human still need to be involved?
- •How will you measure success?
Warning Sign: If you can't answer these questions clearly, spend more time on Step 2 before moving forward. A well-defined problem is half-solved.
⚖️ Step 4: Build vs Buy (The Decision Framework)
This is the most expensive decision you'll make. Choose wrong and you waste months.
Buy (Off-the-Shelf Software): Best when your need matches a common pattern.
- •✅ Appointment scheduling → Calendly, Acuity
- •✅ Email marketing → Mailchimp, ActiveCampaign
- •✅ Basic CRM → HubSpot, Pipedrive
- •✅ Social media scheduling → Buffer, Hootsuite
Pros: Fast to deploy, lower upfront cost, ongoing updates
Cons: Limited customization, monthly fees add up, may not fit your exact workflow
Build (Custom Solution): Best when your process is unique or you need deep integration.
- •✅ Custom quote-to-cash systems (like Ecardz's OMS)
- •✅ Industry-specific matching platforms (like HeadStart's NDIS system)
- •✅ AI voice agents with custom scripts (like Dr. Miller's system)
- •✅ Data matching across proprietary systems (like Duncan Rogers' CRM)
Pros: Exact fit to your workflow, competitive advantage, one-time investment
Cons: Higher upfront cost, longer timeline, need to choose the right development partner
The Decision Shortcut:
- •If 3+ off-the-shelf tools do 80% of what you need → Buy
- •If your workflow is unique and accuracy matters → Build
- •If you're spending $2,000+/month on workarounds → Build (you'll save money)
Most of our clients choose custom because their processes are what make them competitive—generic tools can't replicate that.
🚀 Step 5: The 4-Week Implementation Sprint
Whether you build or buy, this timeline works. Don't let implementation drag on for months.
Discovery & Design - Finalize workflow map from Step 2 - Define all inputs, outputs, and integrations - Create user stories: "As [role], I want to [action] so that [outcome]" - Sign off on scope—what's in the first version, what's future
Build Core Functionality - If buying: Configure the tool, import data, set up integrations - If building: Develop the primary workflow (quote builder, matching engine, voice scripts, etc.) - Set up user accounts and permissions
Test & Refine - Run the automation alongside your manual process for one week - Compare results: Does the automation produce the same (or better) output? - Fix edge cases—the weird situations your workflow map didn't anticipate - Train your team on the new system
Go Live & Measure - Switch to the automated process as primary - Keep the manual process as backup for the first week - Track key metrics daily: time saved, errors, completion rate - Gather team feedback and make quick adjustments
The Result? Ecardz went from manual quoting to a fully operational OMS in 3 weeks. HeadStart's matching platform was live in 4 weeks. Dr. Miller's voice agent was operational in 4 weeks. This timeline is proven.
📊 Step 6: Measure, Learn, Expand
Your first automation is a beachhead, not the end goal.
Measure (Weeks 1-4 Post-Launch):
- •Track the metrics you defined in Step 3
- •Compare directly: "Before: 30 min/quote. After: 3 min/quote."
- •Calculate actual ROI: time saved × hourly cost vs. automation investment
- •Document what worked and what needs refinement
Learn (Month 2):
- •What edge cases came up that you didn't anticipate?
- •Is the team using it consistently or falling back to manual?
- •Are there adjacent processes that could benefit from the same system?
- •What feedback are customers giving?
Expand (Month 3+):
- •Add the next automation. Your second one will be faster because you understand the process now.
- •Connect systems: your CRM data feeds your quote builder, your voice agent data feeds your CRM
- •Build dashboards for visibility across all automated processes
The Pattern We See:
- •First automation: 4 weeks, cautious, learning curve
- •Second automation: 2-3 weeks, confident, team advocates for it
- •Third automation: 1-2 weeks, team suggests processes to automate
Once your team experiences the relief of automation, they become your biggest champions for the next project.
Warning Sign: If your first automation isn't showing clear time savings within 2 weeks of going live, something in the workflow map or implementation needs revisiting. Don't let a broken system become the new normal.
💡 See These Strategies in Action
Real businesses, real results. Explore how companies implemented these concepts:
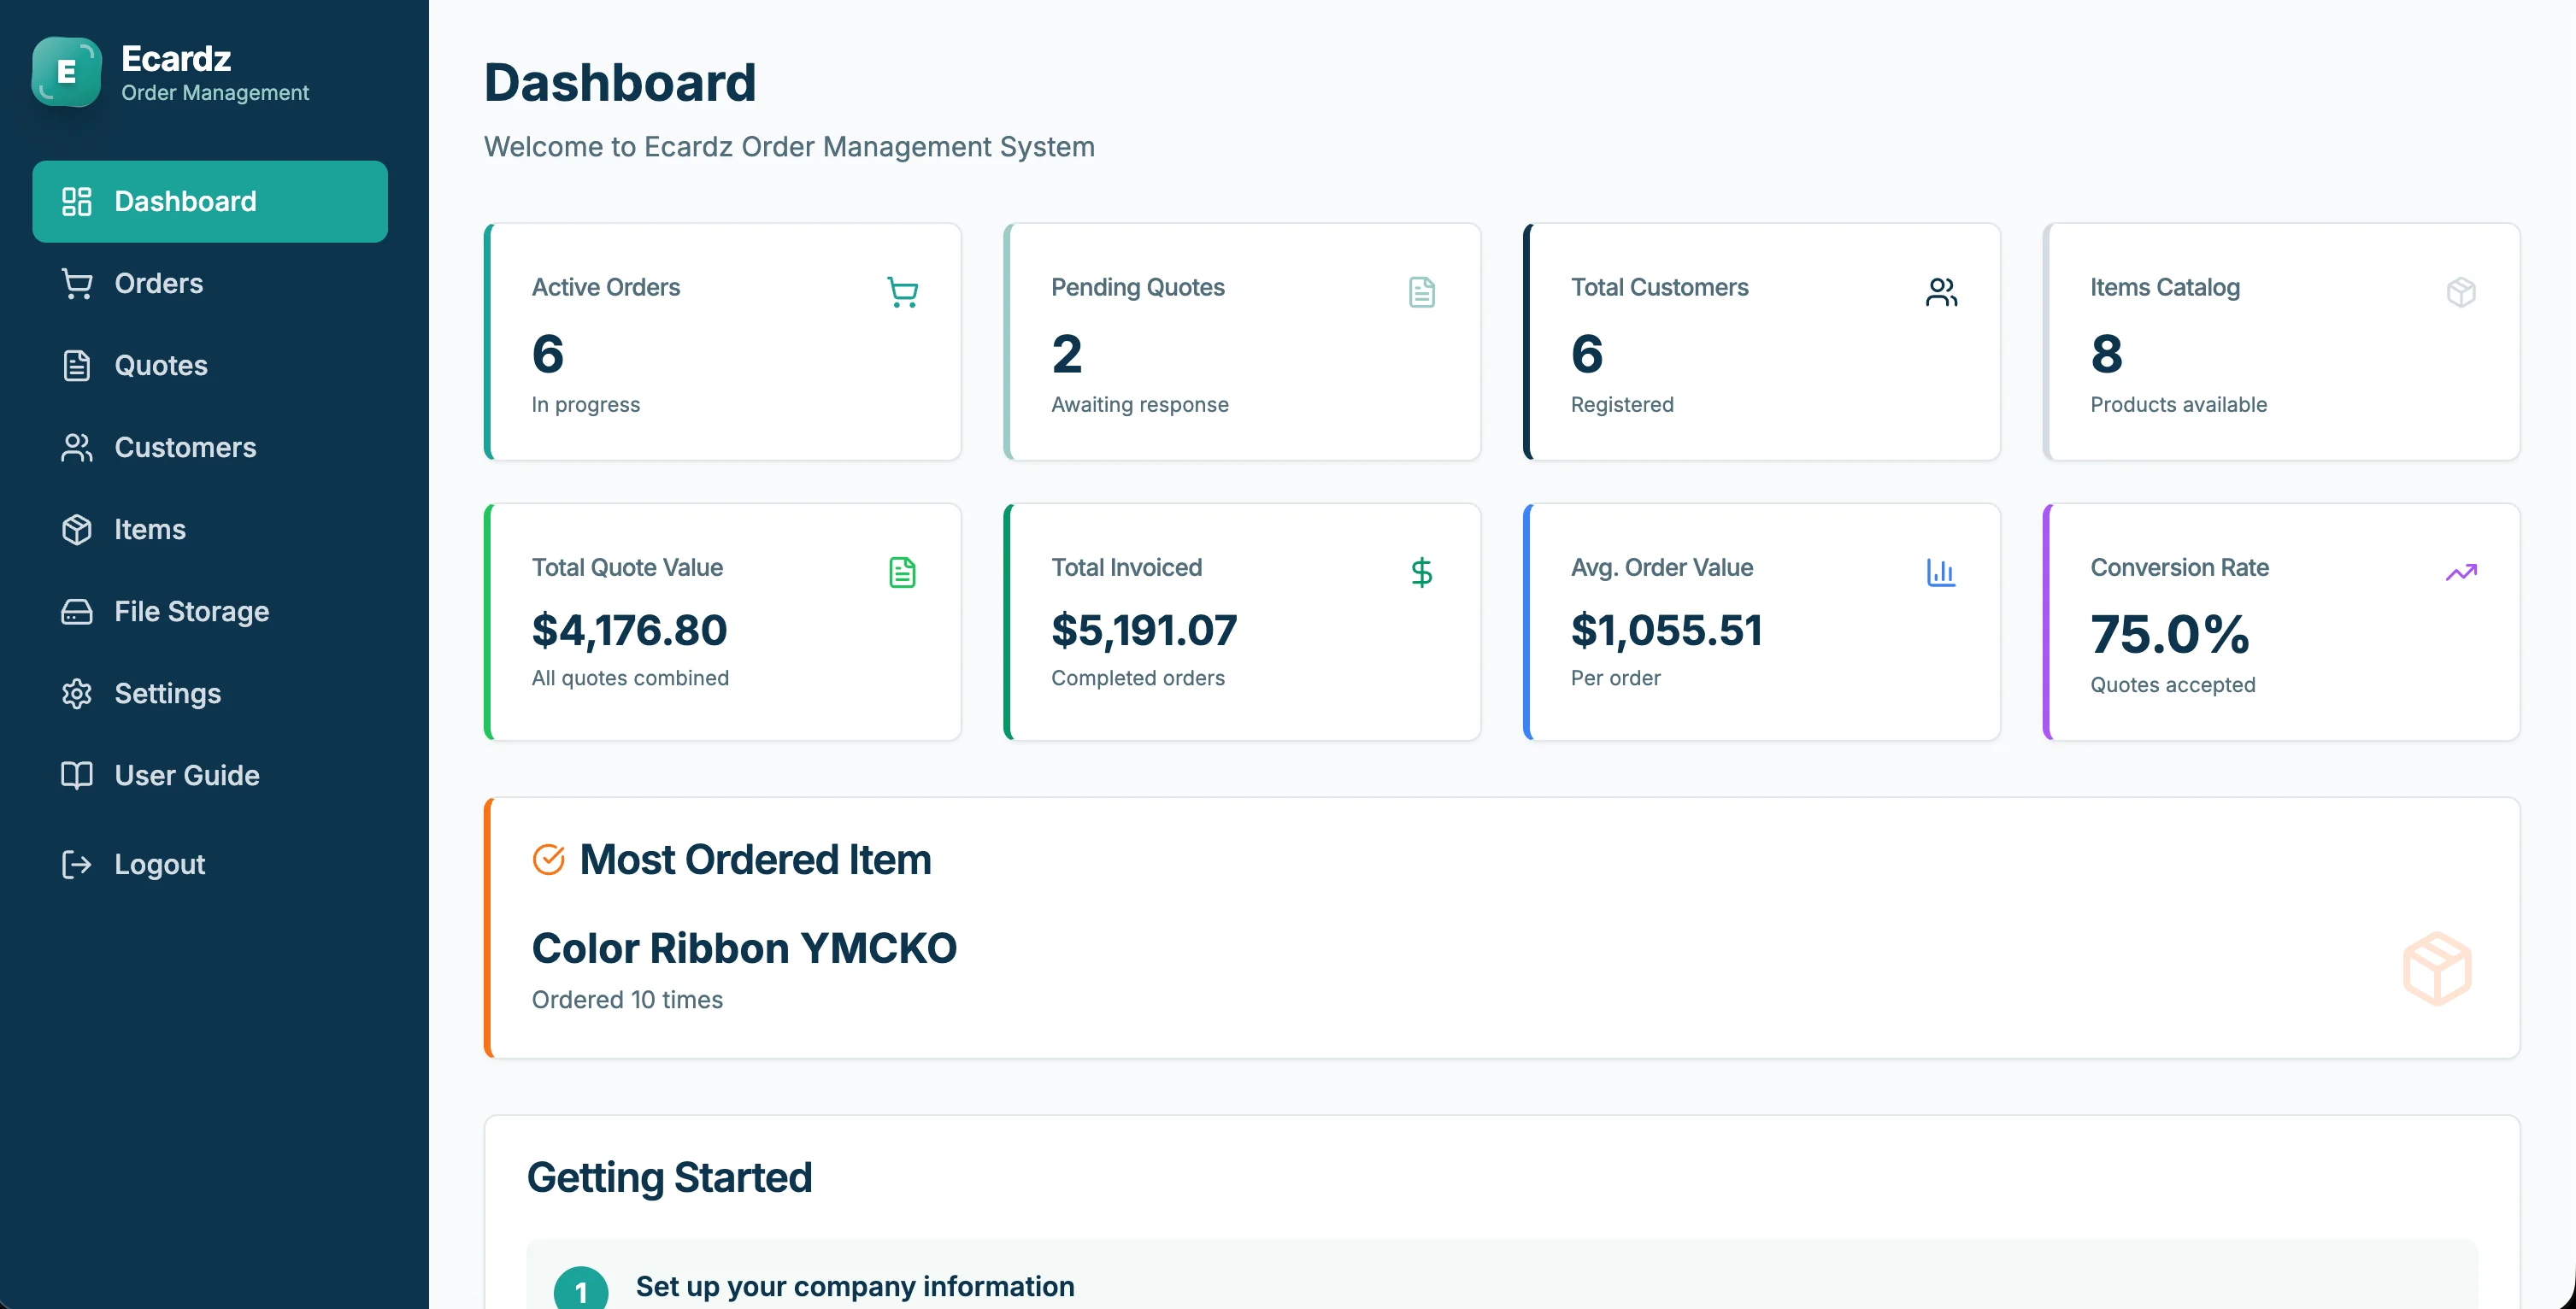
Ecardz Order Management
Quote-to-cash automation for print manufacturing
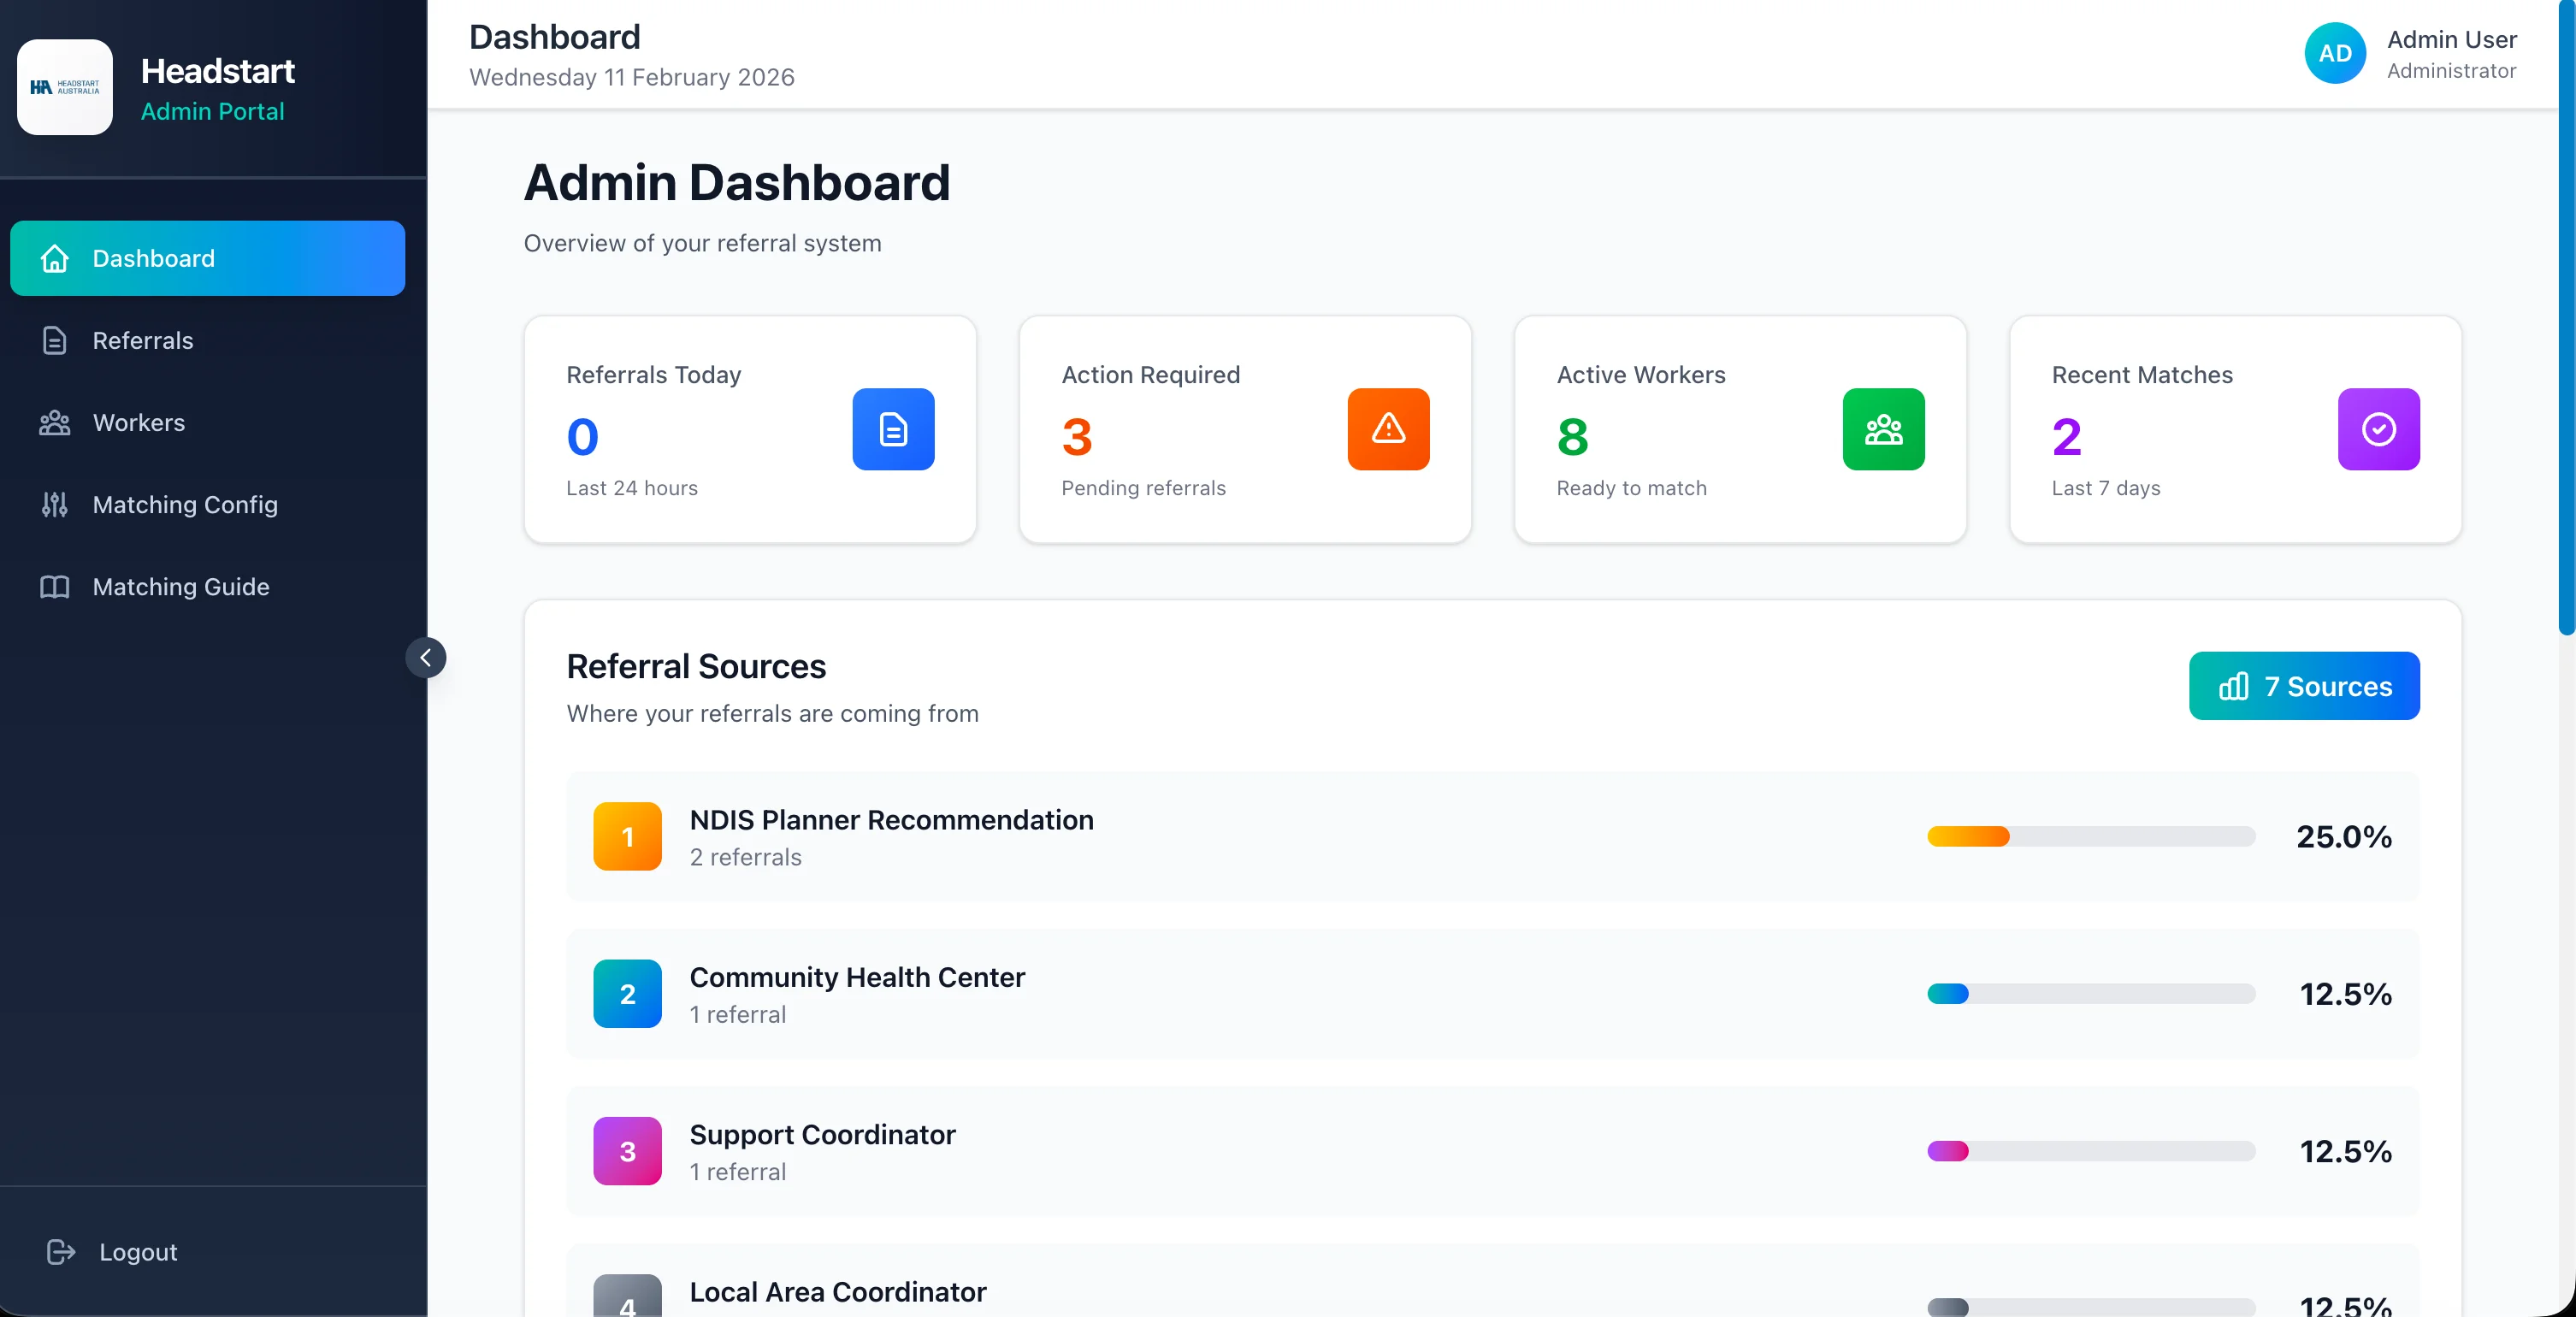
HeadStart Care Matching
NDIS participant-worker matching platform
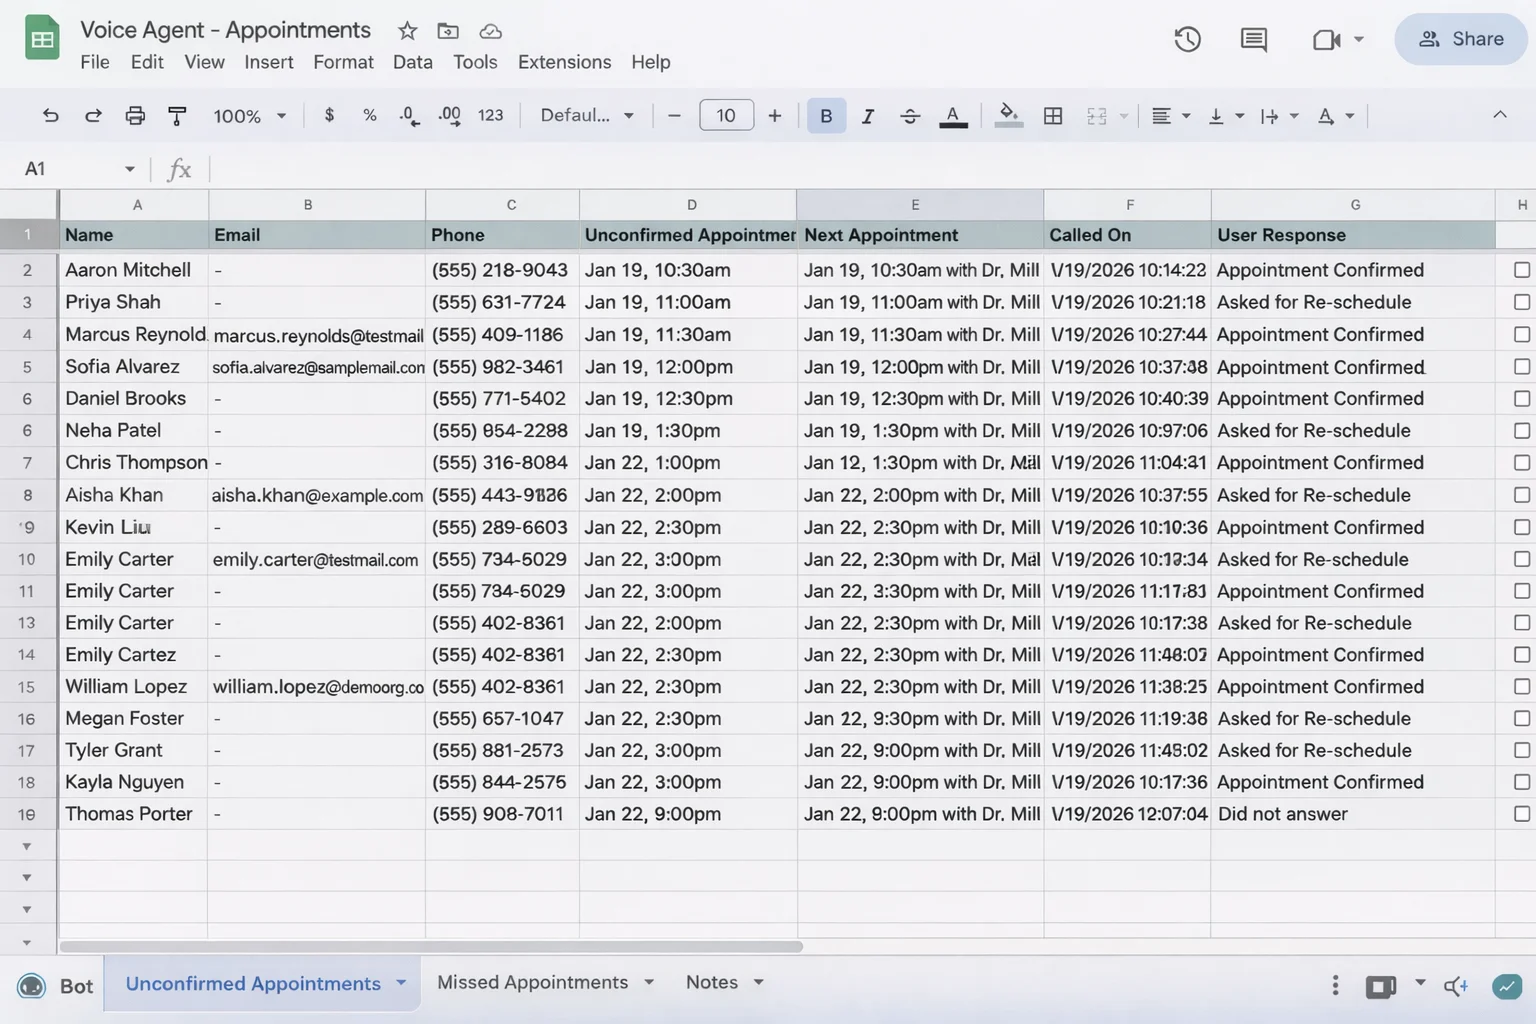
Dr. Miller Voice AI
Healthcare appointment automation
Duncan Rogers CRM
Contact verification across 200K+ records
Key Takeaways
Quick wins and actionable insights from this guide:
- Start with a process that is repetitive, rules-based, time-consuming, and measurable—not your most complex workflow
- Map your current workflow step-by-step before building anything (the napkin test)
- Define success clearly: 'Process X takes Y minutes instead of Z, with [accuracy], and [who does what]'
- Build custom when your process is unique; buy off-the-shelf when your need matches a common pattern
- The 4-week sprint (discover → build → test → launch) is proven across multiple industries
- Your first automation takes 4 weeks; your second takes 2-3; your third takes 1-2 as your team gains confidence
AI 101 Services Team
Business Automation Specialists
AI 101 Services helps service businesses implement AI automation solutions that deliver measurable ROI. With 21+ solutions delivered and 15+ clients served, we specialize in turning manual chaos into streamlined digital workflows.